This is a continuation of the previous article “OOP in VB6?”. If you haven’t read that one, be sure to read it first and then get back to this. You can read the previous article by clicking on the title “OOP in VB6?” below:
If you want to code-along with me, we’ll be using the formless VB6 application since we don’t necessarily need a form to illustrate this concept.
Creating the Class
Okay, so to do this we’ll need to a “class” module. You can do this from the project window, right-click on the Project, then click “Add” and then “Class Module”

Go on a proceed to select “Class Module” and click “Open”

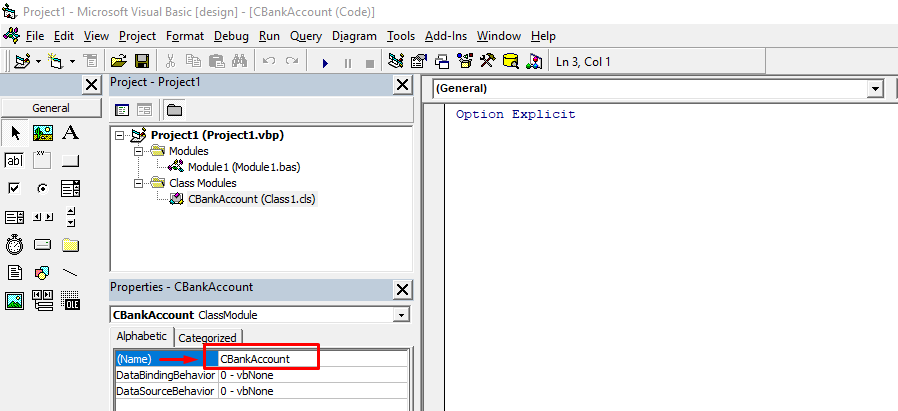
You’d end up with a blank class module like below:
Next, let’s rename this from “Class1” to something more descriptive for our demo “CBankAccount”.
We use the capital “C” prefix just to indicate it’s a class module (“M” for basic module, “F” for form class)
Writing the Class
Okay, let’s type the initial codes for this class. We’ll just need a single data to hold the balance and the rest will be methods that will encapsulate this data.
Here are the codes, so you can just copy + paste them:
Option Explicit

Private mdblBalance                         As Double

Public Sub Deposit(ByVal Amount As Double)
    If Amount < 0 Then
        '
        ' prevent negative deposits
        '
        Err.Raise vbObjectError + 101, , "Negative deposits are not allowed"
    Else
        '
        ' you may require "minimum deposit" verification here
        ' but for this demo, we'll just accept any positive
        '
        mdblBalance = mdblBalance + Amount
    End If
End Sub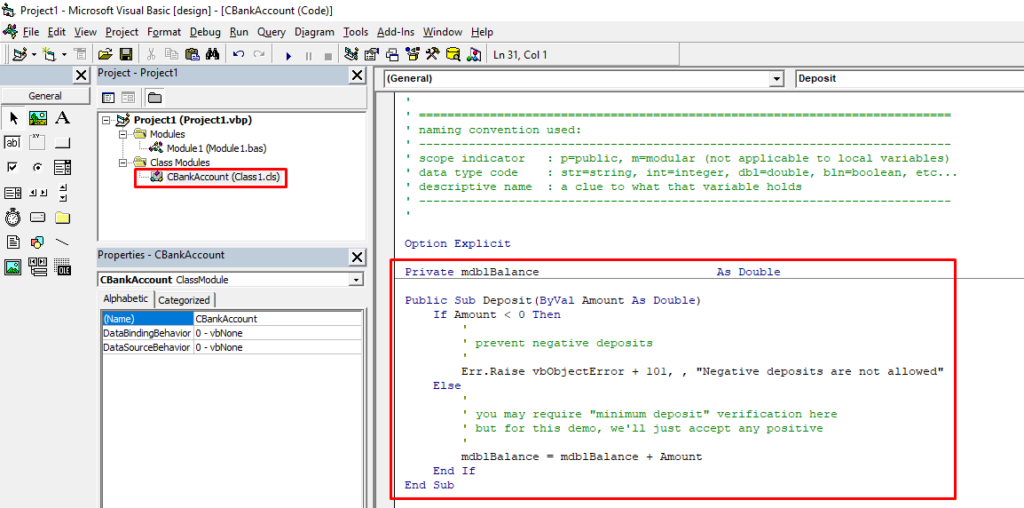
Next, we’ll create another function to encapsulate retrieving the balance:
Public Function GetBalance() As Double
    '
    ' we are just going to return the value of our
    ' protected (or encapsulated) variable
    '
    GetBalance = mdblBalance
End Function
The last method is for withdrawing from this account:
Sub Withdraw(ByVal Amount As Double)
    '
    ' you can do this at least 2 ways, either require Amount to be negative
    ' and then add it to balance, effectively substracting it.
    ' ---
    ' or ensure it's positive and perform substraction, which is what
    ' we'll do on this demo.
    '

    Amount = Abs(Amount)        ' ensure the value is positive using Abs(olute) function

    If Amount > GetBalance Then
        '
        ' prevent withdrawing more than what is there
        '
        Err.Raise vbObjectError + 201, , "Amount to be withdrawn is larger than current balance"
    End If

    mdblBalance = mdblBalance - Amount
End Sub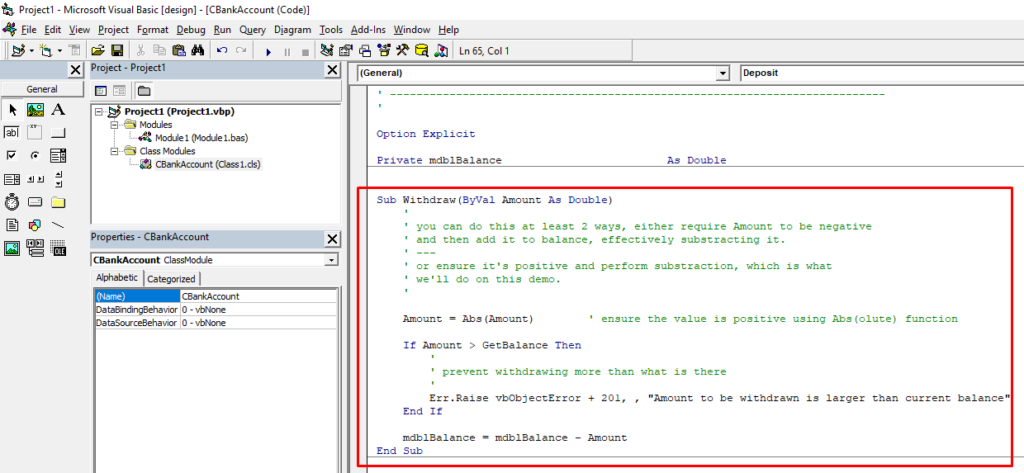
Testing the Class
The class is done, so now we’ll switch to and reuse the existing basic module (Module1) and write our test codes there.
First, remove the codes we wrote inside the “Sub Main” procedure, or remove all codes then copy + paste the code below:
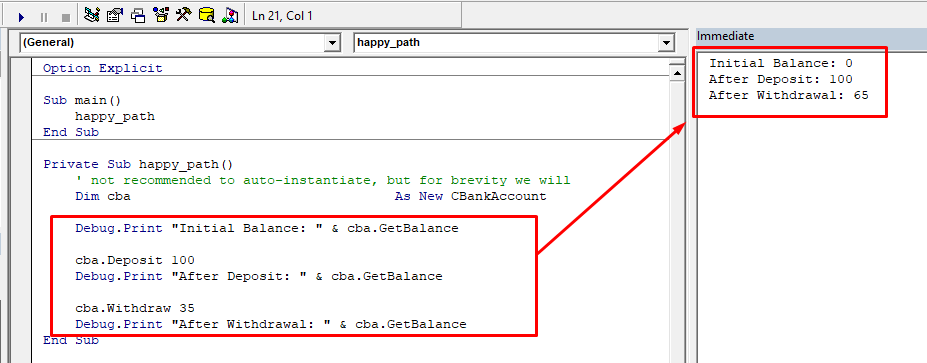
:: Happy Path
Happy Path just means we’re using the class as it’s intended, making sure we pass the right values and everyone and everything is happy 🙂
Option Explicit

Sub main()
    happy_path
End Sub

Private Sub happy_path()
    ' not recommended to auto-instantiate, but for brevity we will
    Dim cba                                 As New CBankAccount

    Debug.Print "Initial Balance: " & cba.GetBalance

    cba.Deposit 100
    Debug.Print "After Deposit: " & cba.GetBalance

    cba.Withdraw 35
    Debug.Print "After Withdrawal: " & cba.GetBalance
End Sub
Now run this project and you should see that it works as expected (from the Immediate window):
:: Negative Testing
This is the opposite of Happy Path since our objective in this test is to intentionally break our code 🙂
I know it sounds weird, but this not only ensures you’ve tested it completely, but also ensures we handled all the exceptions properly.
But before we even do that, we have to make sure the IDE is configured to allow us to perform the tests correctly.
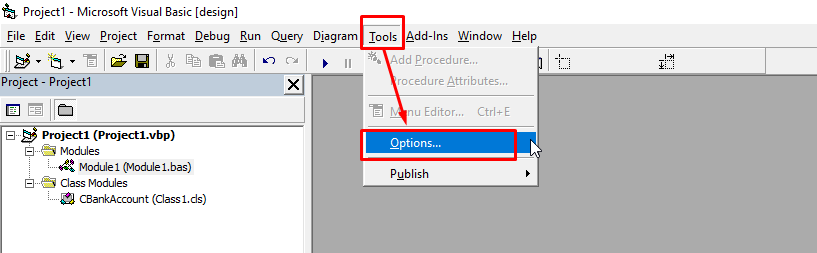
So go to the “Tools” menu then click on “Options…”:
Navigate to the “General” tab, and under “Error Trapping”, select the “Break on Unhandled Errors”.
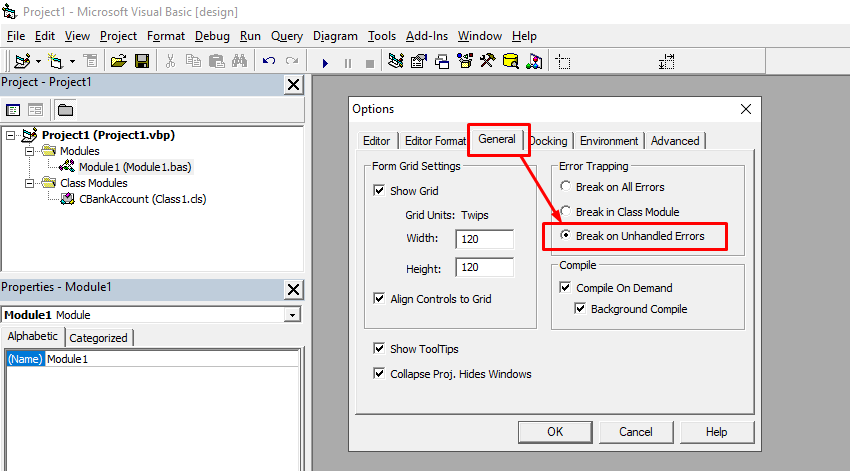
This is critical if you want to catch the exceptions, like the ones we made inside the class via “Err.Raise” calls.
Now we can move on to writing our negative test case:
NOTE: we have commented out the “happy_path” line in Sub Main so it doesn’t get executed when we test it.
But you can leave it be.
Sub main()
    'happy_path
    negative_tests
End Sub


Private Sub negative_tests()
    ' not recommended to auto-instantiate, but for brevity we will
    Dim cba                                 As New CBankAccount

    ' VB6 does not have TRY..CATCH so we'll emulate that via On Error Resume
    ' BUT don't use this to hide errors; that's lazy and bad :)
    On Error Resume Next
    cba.Deposit -45
    If Err.Number <> 0 Then
        Debug.Print Err.Description
    End If

    cba.Withdraw 88
    If Err.Number <> 0 Then
        Debug.Print Err.Description
    End If

End Sub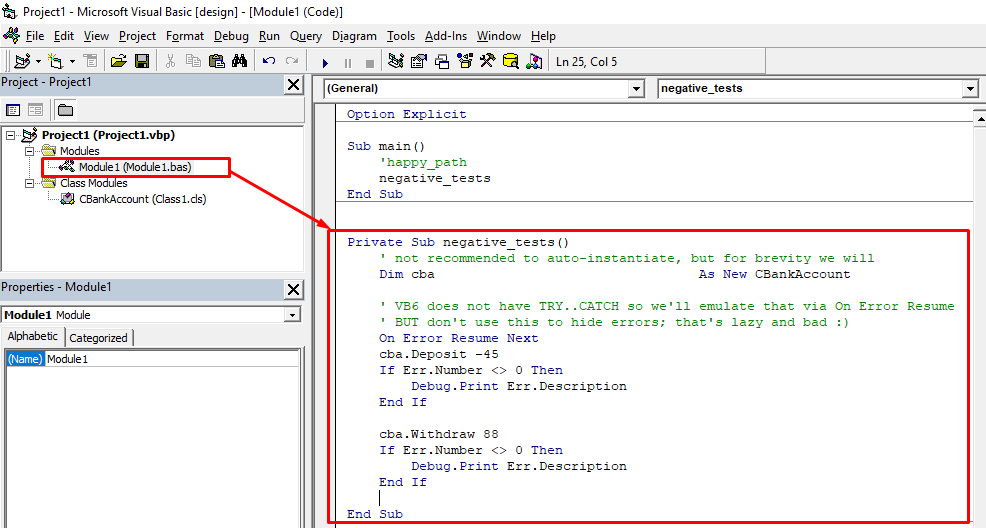
We test it and verify that it indeed raised the errors we defined in our class:

I’ll will cover the next one (“Polymorphism”) on the next article so stay tuned 🙂
Here’s the link to my GitHub page for the source codes:
https://github.com/vegitz/codes/tree/master/0008%20Encapsulation%20in%20VB6